Streamline IaC with AI
Creating new infrastructure should be fast, consistent, and policy-driven. Instead of manually writing Terraform for every new cloud resource such as S3 bucket, you can let an AI coding agent safely generate the Terraform files, open a pull request against your IaC repository, and surface the change for review — all within Port. The entire process remains governed, compliant, and aligned with your organization’s engineering standards, ensuring that every new resource is created securely and according to best practices
This guide demonstrates how to create a self-service action that allows developers to request new cloud resource through Port, which then automatically triggers a coding assistant for Terraform code generation and PR creation.

Prerequisites
This guide assumes you have:
- Completed the onboarding process
- A Port account with AI agents feature enabled
- Port's GitHub app installed in your account
- Completed the setup in the Trigger GitHub Copilot from Port guide
- An existing Terraform repository for your infrastructure code
- AWS resources synced into Port (e.g., via AWS integration)
While this guide uses GitHub Copilot as the coding agent, you can easily substitute it with other AI coding assistants like Claude Code or Google Gemini. Simply update the action's webhook URL and payload structure in the automation to match your preferred coding agent's API.
Set up data model
First, you need to ensure your data model includes the necessary blueprints for S3 buckets and AWS accounts.
When installing the AWS integration in Port, the AWS Account blueprint is created by default.
However, the S3 blueprint is not created automatically so we will need to create it manually.
Create S3 bucket blueprint
- Go to the builder page of your portal
- Click on
+ Blueprint - Click on the
{...} Edit JSONbutton - Copy and paste the following JSON configuration:
S3 bucket blueprint (Click to expand)
{
  "identifier": "awsS3Bucket",
  "description": "This blueprint represents an AWS S3 bucket in our software catalog",
  "title": "S3",
  "icon": "Bucket",
  "schema": {
    "properties": {
      "link": {
        "format": "url",
        "type": "string",
        "title": "Link"
      },
      "regionalDomainName": {
        "type": "string",
        "title": "Regional Domain Name"
      },
      "versioningStatus": {
        "type": "string",
        "title": "Versioning Status",
        "enum": [
          "Enabled",
          "Suspended"
        ]
      },
      "encryption": {
        "type": "array",
        "title": "Encryption"
      },
      "lifecycleRules": {
        "type": "array",
        "title": "Lifecycle Rules"
      },
      "publicAccessConfig": {
        "type": "object",
        "title": "Public Access"
      },
      "tags": {
        "type": "array",
        "title": "Tags"
      },
      "arn": {
        "type": "string",
        "title": "ARN"
      },
      "region": {
        "type": "string",
        "title": "Region"
      },
      "blockPublicAccess": {
        "type": "boolean",
        "title": "Block Public Access"
      }
    },
    "required": []
  },
  "mirrorProperties": {},
  "calculationProperties": {},
  "aggregationProperties": {},
  "relations": {
    "account": {
      "title": "account",
      "target": "awsAccount",
      "required": false,
      "many": false
    }
  }
}
- Click
Createto save the blueprint
Update integration mapping
- Go to the data sources page of your portal
- Find your AWS integration and click on it
- Go to the
Mappingtab - Add the following YAML configuration:
AWS integration mapping (Click to expand)
deleteDependentEntities: true
createMissingRelatedEntities: true
enableMergeEntity: true
resources:
  - kind: AWS::Organizations::Account
    selector:
      query: 'true'
    port:
      entity:
        mappings:
          identifier: .Id
          title: .Name
          blueprint: '"awsAccount"'
          properties:
            arn: .Arn
            email: .Email
            status: .Status
            joined_method: .JoinedMethod
            joined_timestamp: .JoinedTimestamp | sub(" "; "T")
  - kind: AWS::S3::Bucket
    selector:
      query: 'true'
    useGetResourceAPI: true
    port:
      entity:
        mappings:
          identifier: .Identifier
          title: .Identifier
          blueprint: '"awsS3Bucket"'
          properties:
            regionalDomainName: .Properties.RegionalDomainName
            encryption: .Properties.BucketEncryption.ServerSideEncryptionConfiguration
            lifecycleRules: .Properties.LifecycleConfiguration.Rules
            publicAccessConfig: .Properties.PublicAccessBlockConfiguration
            blockPublicAccess: >-
              .Properties.PublicAccessBlockConfiguration | (.BlockPublicAcls and
              .IgnorePublicAcls and .BlockPublicPolicy and
              .RestrictPublicBuckets)
            tags: .Properties.Tags
            arn: .Properties.Arn
            region: .Properties.RegionalDomainName | capture(".*\\.(?<region>[^\\.]+)\\.amazonaws\\.com") | .region
            link: .Properties | select(.Arn != null) | "https://console.aws.amazon.com/go/view?arn=" + .Arn
          relations:
            account: .__AccountId
- Click
Save & Resyncto apply the mapping
Create AI agent
Next, you'll create an AI agent that analyzes cloud resource requests and dispatches the coding agent to process the request.
- Go to the AI Agents page of your portal
- Click on
+ AI Agent - Toggle
Json modeon - Copy and paste the following JSON schema:
Terraform IaC Creator AI agent (Click to expand)
{
  "identifier": "terraform_ai_agent",
  "title": "Terraform IaC Creator",
  "icon": "AI",
  "properties": {
    "description": "An AI-powered agent that generates Terraform files to provision cloud resources such as S3 buckets directly from Port.",
    "status": "active",
    "prompt": "You are a **Terraform Infrastructure AI Agent**. Your role is to generate **technical requirements** for new cloud resources using Terraform — not to write Terraform code directly.\n\n### 🎯 Objective\nWhen a user requests a new cloud resource (e.g., AWS S3 bucket, EC2 instance), analyze the request and create a detailed **GitHub issue** describing what Terraform configuration should be created.\n\n### 🧩 Inputs\nUse available input data such as:\n- Resource type (e.g., S3 bucket, EC2 instance)\n- Resource name or identifier\n- Configuration options (e.g., encryption, tags, versioning, lifecycle rules, instance type, VPC ID)\n\n### 🧠 Task\nGenerate a **GitHub issue** with:\n\n#### 🏷️ Title:\n`Provision New <Resource Type>: <resource_name>`\n\n#### 📝 Description (in Markdown):\n1. **Resource Details** – Describe the resource, configuration fields, and intended purpose.\n2. **Terraform Specification Requirements** – Outline what the Terraform configuration must include:\n   - Correct resource definition (e.g., `aws_s3_bucket`, `aws_instance`, etc.)\n   - Secure defaults:\n     * Encryption enabled where supported\n     * Public access blocked for resources that support ACLs or network exposure\n     * Versioning/lifecycle rules where applicable\n     * IAM policies following least privilege\n     * Tags including `created_by = \"port-ai\"` and `managed_by = \"terraform\"`\n   - Outputs that expose essential identifiers (e.g., ARN, domain name, instance ID)\n3. **Suggested File Path** – Suggest a logical file location (e.g., `terraform/aws/<resource>.tf` or `modules/<type>` if modules exist).\n4. **Acceptance Criteria** – Define success conditions:\n   - Terraform configuration passes `terraform validate`\n   - Required tags are applied\n   - Sensitive data is not exposed in outputs\n\n#### 🏷️ Labels\nAlways include: `iac`, `terraform`, `aws`, and `auto_assign`.\n\n### ⚙️ Action\nAlways call the `create_github_issue` self-service action to create the GitHub issue with the generated **title**, **description**, and **labels**.\n\n### 🧭 Guidelines\n- Do **not** generate Terraform code directly.\n- Focus on clarity, correctness, and compliance with engineering best practices.\n- Use Markdown formatting for readability.\n- Keep each issue focused on a single resource.\n- Always include the `auto_assign` label for issue tracking.",
    "execution_mode": "Automatic",
    "tools": [
      "^(list|get|search|track|describe)_.*",
      "run_create_github_issue"
    ]
  },
  "relations": {}
}
- Click
Createto save the agent.
The AI agent uses MCP (Model Context Protocol) enhanced capabilities to automatically discover important and relevant blueprint entities via its tools. The ^(list|get|search|track|describe)_.* pattern allows the agent to access and analyze related entities in your software catalog, providing richer context for infrastructure analysis. Additionally, we explicitly add run_create_github_issue to the tools, which instructs the AI agent to call this specific action to create GitHub issues for Terraform resource provisioning.
Create self-service action
Now, you'll create a self-service action that allows developers to request new cloud resources. This action will invoke an AI agent to analyze the request.
- Go to the self-service page of your portal
- Click on
+ New Action - Click on the
{...} Edit JSONbutton - Copy and paste the following JSON configuration:
Provision cloud resource action (Click to expand)
{
  "identifier": "provision_cloud_resource",
  "title": "Provision Cloud Resource",
  "icon": "AWS",
  "description": "Request a new cloud resource such as s3 bucket to be provisioned via Terraform",
  "trigger": {
    "type": "self-service",
    "operation": "CREATE",
    "userInputs": {
      "properties": {
        "prompt": {
          "type": "string",
          "title": "Description",
          "description": "Describe the resource you want to create. Include details like name, region, encryption requirements, versioning, lifecycle rules, tags, and any other specific requirements",
          "format": "markdown"
        },
        "terraform_repository": {
          "title": "Terraform Repository",
          "icon": "DefaultProperty",
          "type": "string",
          "blueprint": "service",
          "format": "entity"
        }
      },
      "required": [
        "prompt",
        "terraform_repository"
      ],
      "order": [
        "prompt",
        "terraform_repository"
      ]
    }
  },
  "invocationMethod": {
    "type": "WEBHOOK",
    "url": "https://api.getport.io/v1/agent/terraform_ai_agent/invoke",
    "agent": false,
    "synchronized": true,
    "method": "POST",
    "headers": {
      "RUN_ID": "{{ .run.id }}",
      "Content-Type": "application/json"
    },
    "body": {
      "prompt": "You are an expert Terraform author. A user has requested the creation of a new cloud resource using Infrastructure as Code.\n\nRepository: {{ .inputs.terraform_repository.identifier }}\nUser Request: {{ .inputs.prompt }}\n",
      "labels": {
        "source": "provision_cloud_resource_action"
      }
    }
  },
  "requiredApproval": false
}
- Click
Saveto create the action.
Test your workflow
Now it's time to test your complete cloud resource provisioning workflow:
- Click on the
Provision Cloud Resourceaction in the self-service page of your portal - Fill out the
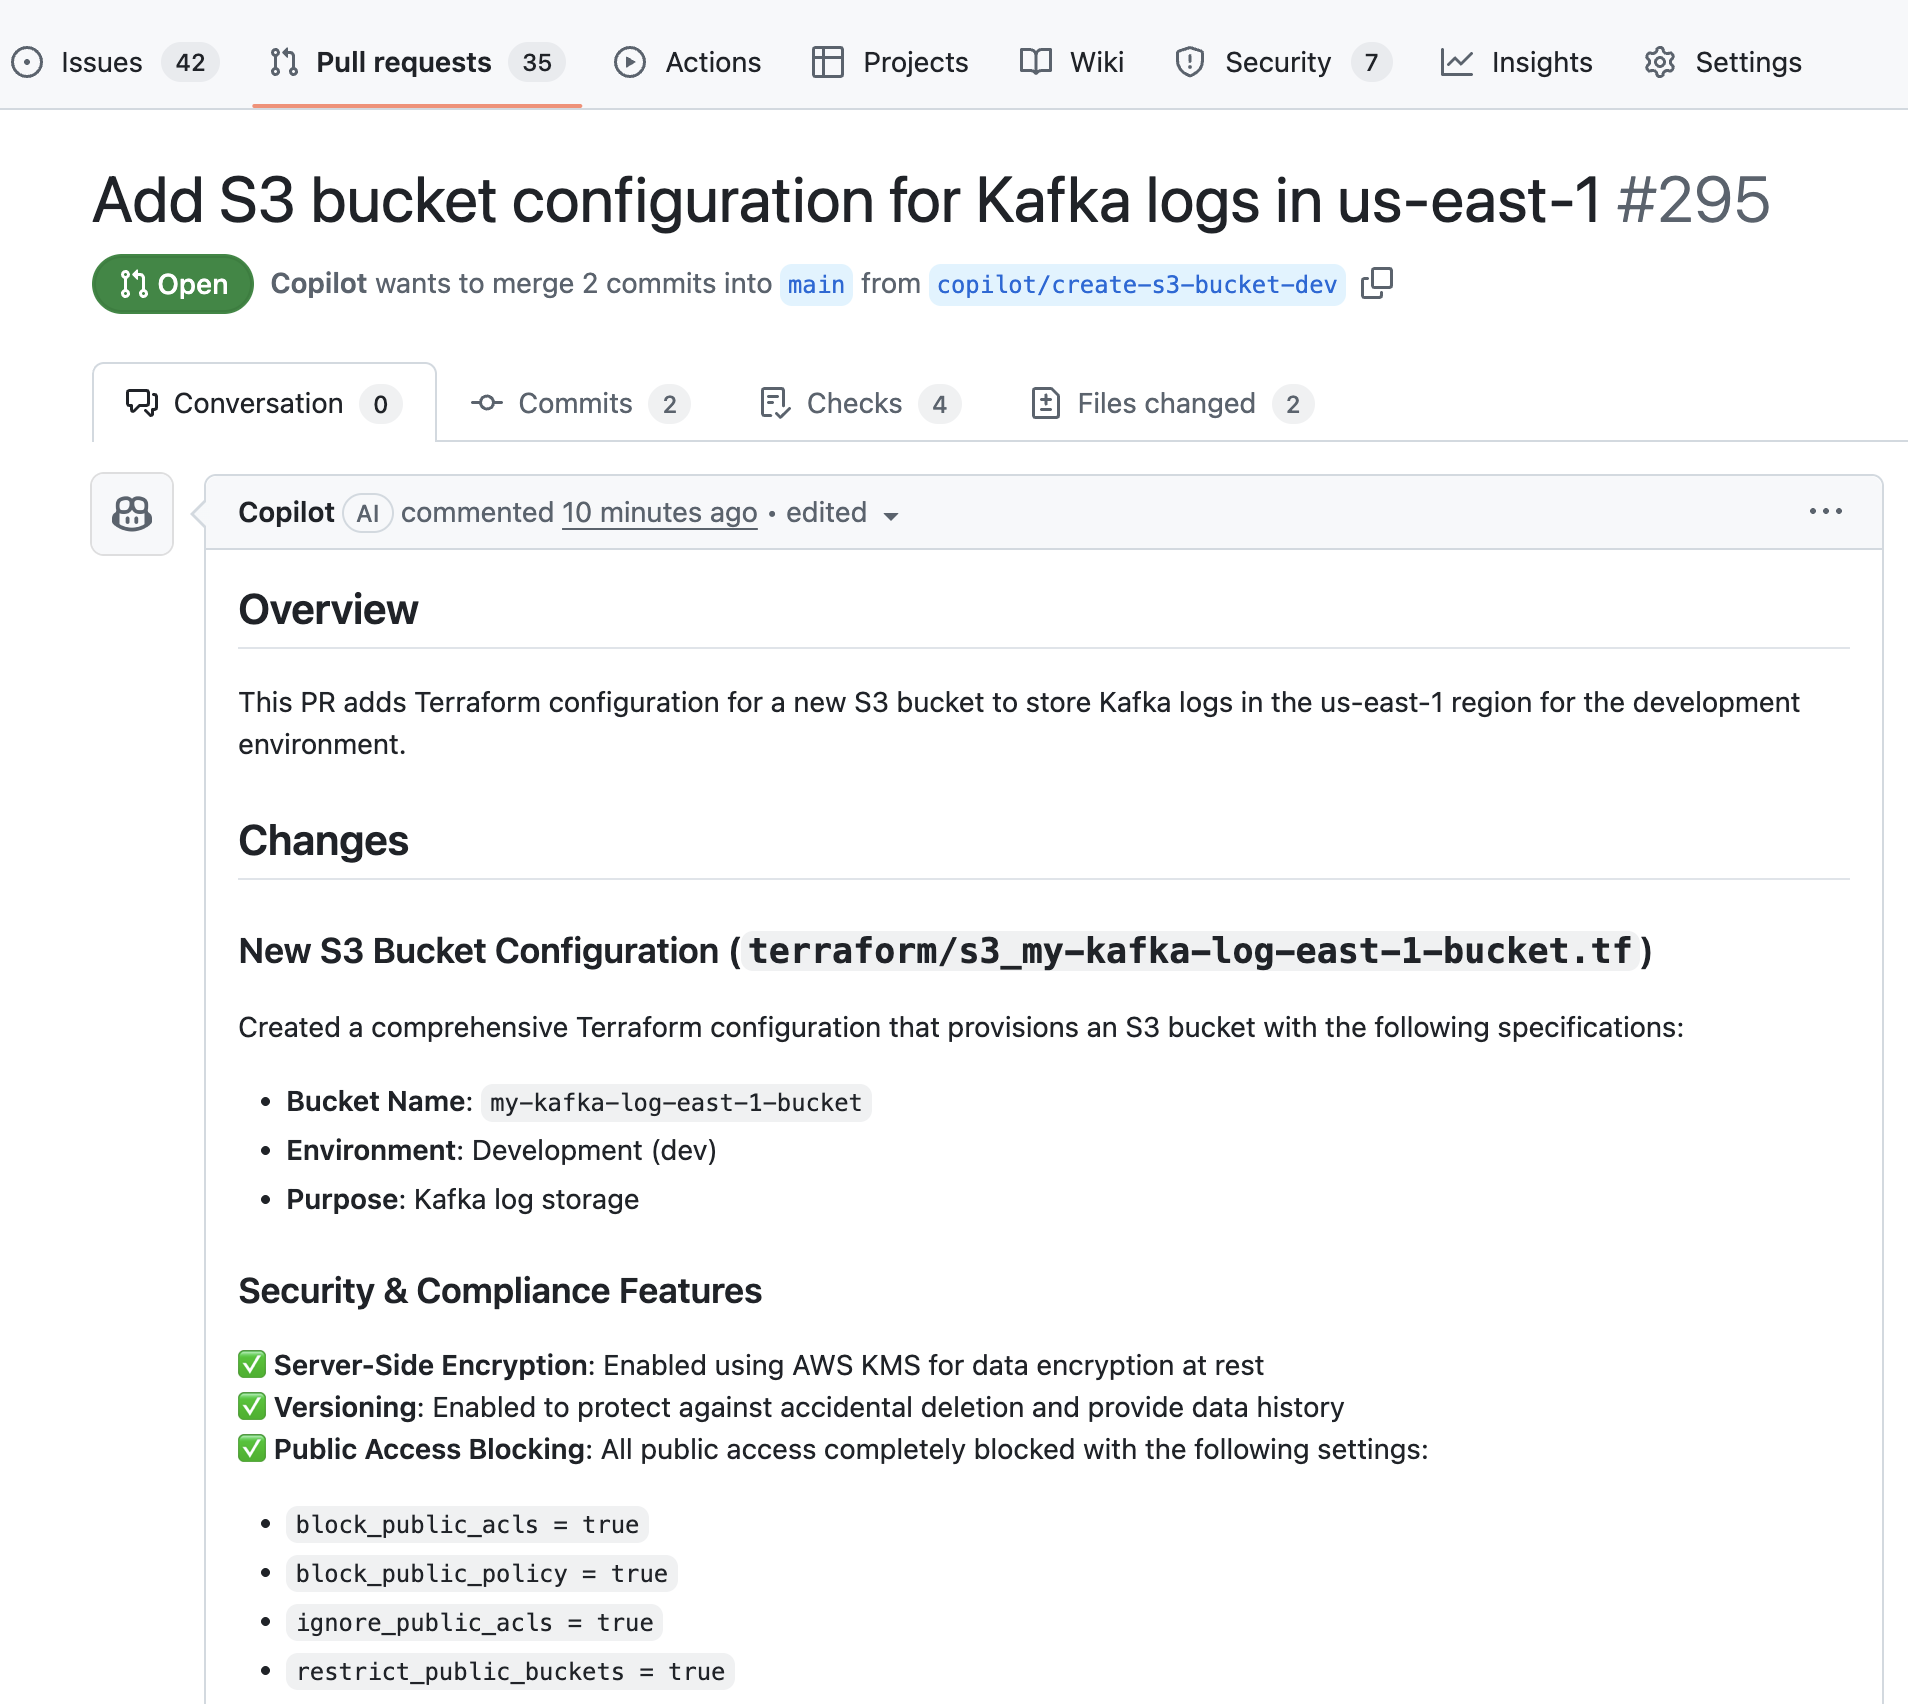
promptfield with your resource requirements, for example:Create an S3 bucket named "my-kafka-log-east-1-bucket" for development environment.
Requirements:
- Enable server-side encryption with AWS KMS
- Enable versioning
- Block all public access
- Add tags: Environment=dev, Project=kafka-logs, Owner=platform-team - Select the repository containing your terraform configuration
- Click Execute
The workflow will then:
- AI Agent analyzes your request and generates a detailed GitHub issue with technical requirements
- Issue is automatically assigned to GitHub Copilot (handled by the prerequisites setup)
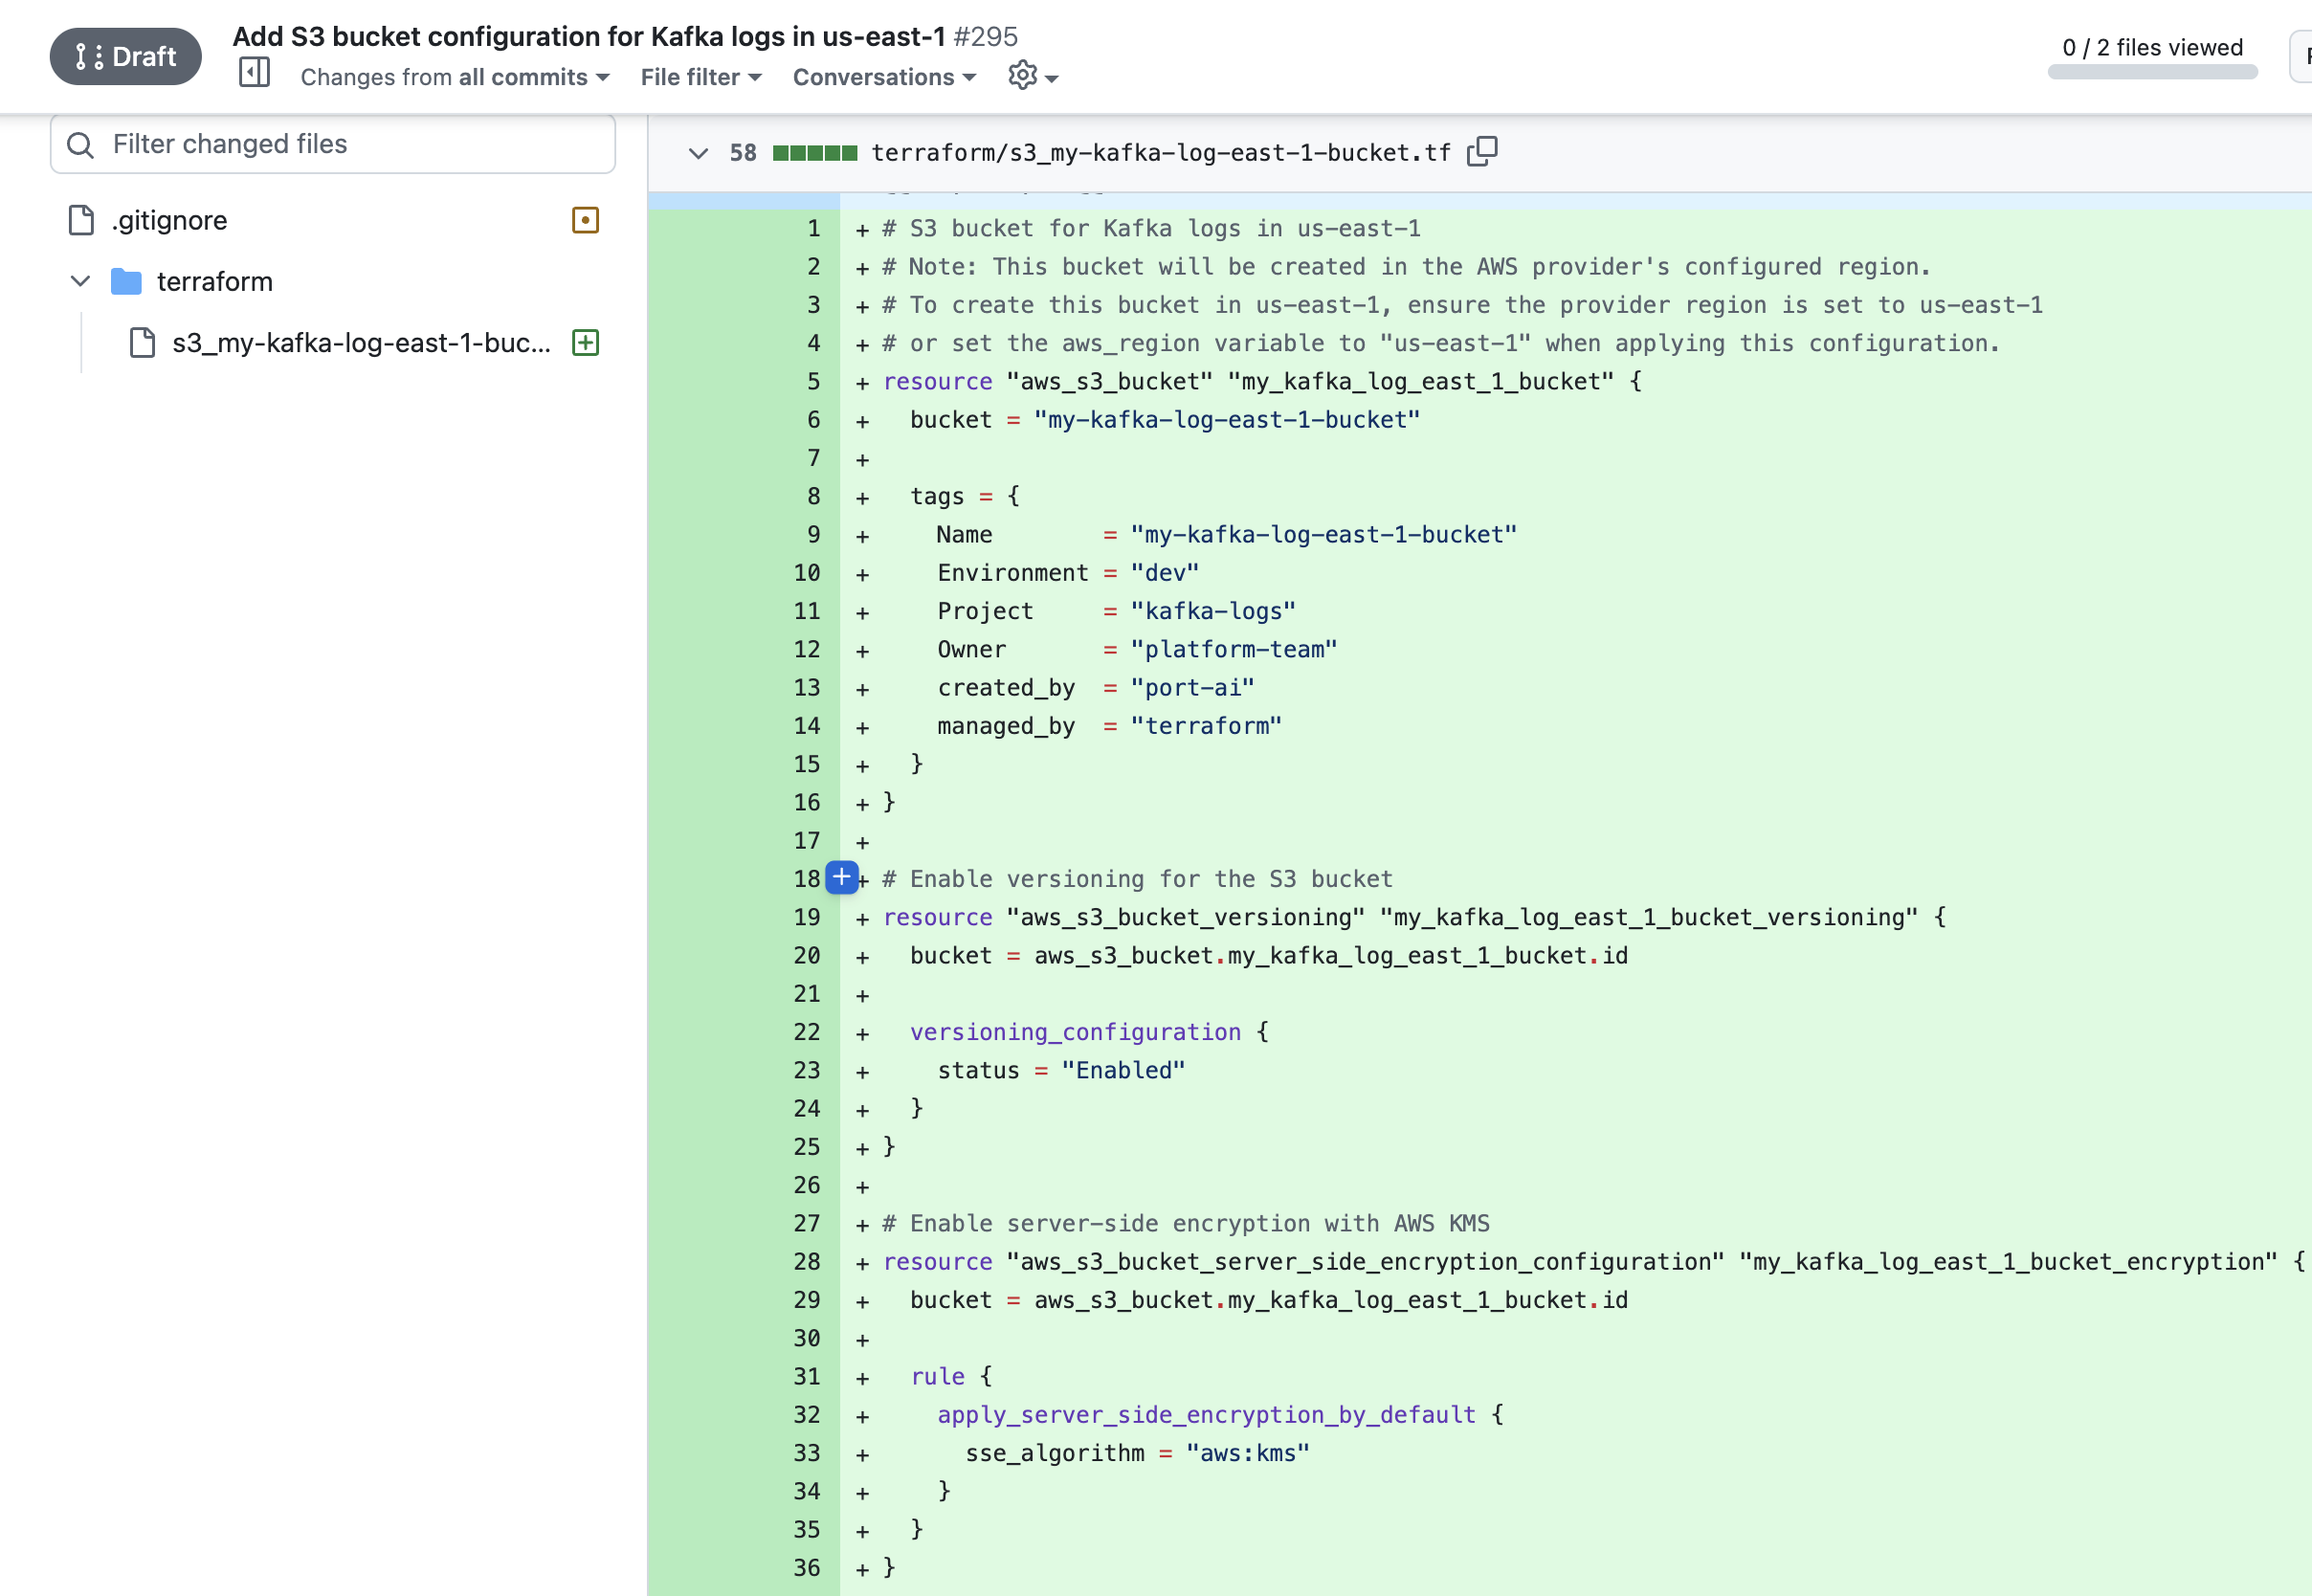
- Copilot generates Terraform code based on the detailed technical requirements
- Pull request is opened with the generated Terraform files